Bright Start – Adding a Picture on a Post/Page
You need to know how to add a picture to a WordPress post or page. Place your cursor in the location that you want to add the image, then select the add image icon as seen in the picture below

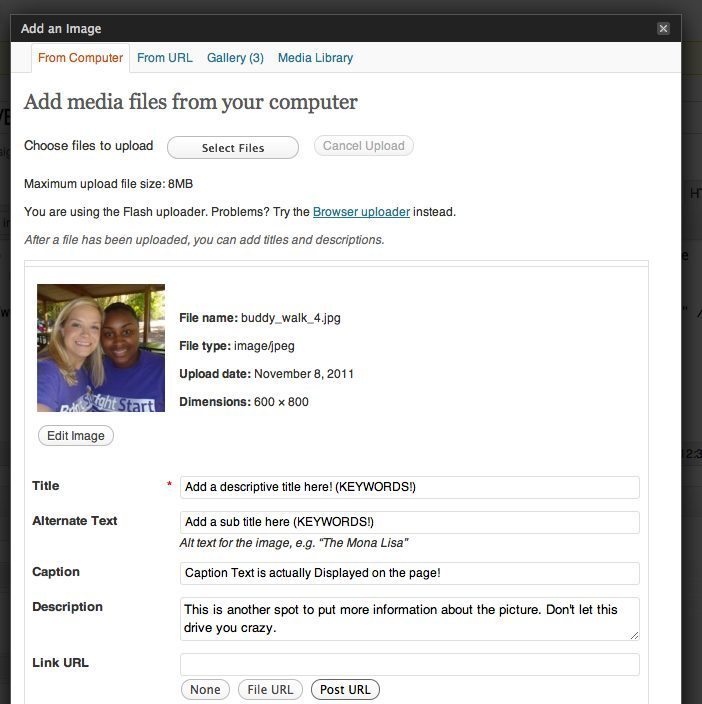
After selecting this button the "Add an Image" dialogue will come up. From here you will choose "Select Files" which will allow you to select an image to upload. Once you choose an image it will be uploaded and you will be brought back to the "Add an Image" dialogue with lots of options for your image. See image below.
This is where things get tricky... pay attention!
- Title - This is a descriptive title section that will be seen by search engines and very rarely by users. User's only see it if they have images turned off... who does that? no one!
- Alternate Text - This is another descriptive section (when I am being lazy I just copy the "Title Section") It is usually seen when you hover over the image and stay there for a second. Some browsers use this "alt text" and some use the "title".
- Caption - The caption is text that actually gets put under the picture. Good if you want to put a clients name under a picture or a short description.
- Description - Another search engine only type of thing... I know annoying at this point. Use this if you want.. if not dont worry to much.
- Link URL - This one is kind of important. Use this if you want. I usually do not. If you do not want to use it make sure you select the "None" button to clear the link URL. A link URL is basically used if you want to show the image small on the page but want the user to be able to click the picture and see it full size. If your on the fence I would say select "None" and do not use it.
The dialogue is too long so I had to break it up into two images. This is good though because the second image is MUCH MORE IMPORTANT. Pay attention to the things in the second image!

- Alignment - IMPORTANT - set the alignment to what you desire. This is similar to what you would use in Microsoft Word or something like that... I say it is important because once you add the picture you would probably have to delete it before you could change the alignment.
- Size - VERY IMPORTANT - set the size of the image, remember the content area of your WordPress website is only 630px so if the width of your picture is greater than that then you are going to have some problems!
- "Insert into Post" - MOST IMPORTANT - Yes, it's not really perfect here you would think "Save All Changes" would add the picture to your post but, nope! You need to make sure you remember to select "Insert into Post"
- You have now added an image to your post/page, click "Publish" or "Update" and go check out your work! Email me if you have any questions.
Donald Grover - [email protected]


